Showing posts with label Mini Albums. Show all posts

Thursday, May 26, 2016

Adventure Mini Album | Jillibean Soup

Hello Friends,

A few months ago I was at a crop and after creating about 5-6 layouts I decided it was time to start a Mini Album. I used to do these about once or twice a month, I loved it. I love flipping thru pages of finished mini albums and I've kept quite a few over the years. I have sold a few, given some as gifts, others recycled, and some are in a safe place for years to come.  They are a bit time consuming ( at least 4-6 hours to create from start to finish ) but well worth the effort.

This little mini album is an Adventure Mini Album. A Let's Go Explore Nature and catch some bugs or butterflies. I probably won't add any pics to this mini and just keep it on my shelf for a few years. I really like it and do enjoy the finished project.

I created this for Jillibean Soup using the Mushroom Medley Collection. It came out a few weeks ago and is available for purchase if you wish to re-create this mini album.

Here we go .. the Adventure Begins.. 


The mini measures 4x6"  - i used kraft cardstock to create my foundation pages
and added patterned paper on top
I left a bit of the kraft cardstock showing for added details.


The white cardstock was doodled with a black journal pen
 - these are mats for photos to be added later . 


Adding pop dots behind diecuts simple adds dimension in the mini album .
 I also added a small wood grain tag to add some journaling or little keepsakes. 


I love twine. If you are familiar with my work I add twine on almost every page
and of course this mini was no exception!


I tried to make every page different by adding papers in different directions,
and sizes. It gives the eye something else to look at other than straight designs.


Here is a close up of the pop dots used under the diecuts.


More white mats for photos.
 I added a mini placemat and backed it up with some orange colored paper.
It adds fun details to the mini don't you think?
You can also cut out a shape with your digital diecut machine and use that.


Some room for tags and more journaling or keepsakes.


I love these huge kraft tags. They measure a bit more than 6" high and just peek out of the mini a little bit . I added twine, a few stickers and created journal lines with a black marker. We always have stories to tell when we are travelling so this is perfect!


I am really happy of the final album. It is one of my all time favorites.
 I love all the details and of course those little diecuts from the Mushroom Medley collection are A-dorable! This little Fox for example .. i placed him behind the grey paper like he was hiding in the bushes or something LOL !


Here is a side view of the completed mini. 
Lots of layers, tags, and " happiness"


Thank you so much for visiting and I hope you enjoyed peeking into my little mini!
If you would like to recreate it please do and of course
I ask that you give me credit as well or link to my blog post. 

Supplies:
Jillibean Soup
Patterned Paper: Mushroom Medley/Bite Size Bits, Chanterelles, Girolles, Trompettes de Mort, Oysters, Morels
Coordinating Stickers: Mushroom Medley
Pea Pod Parts: Mushroom Medley
Mini Placemats: Mushroom Medley
Other: twine, stapler, black pen, kraft chipboard, binder rings.

Visit Me on Instagram for more sneaks and projects ;-) @KristineDavidson


Thursday, August 21, 2014

Happy Halloween | Simple Stories

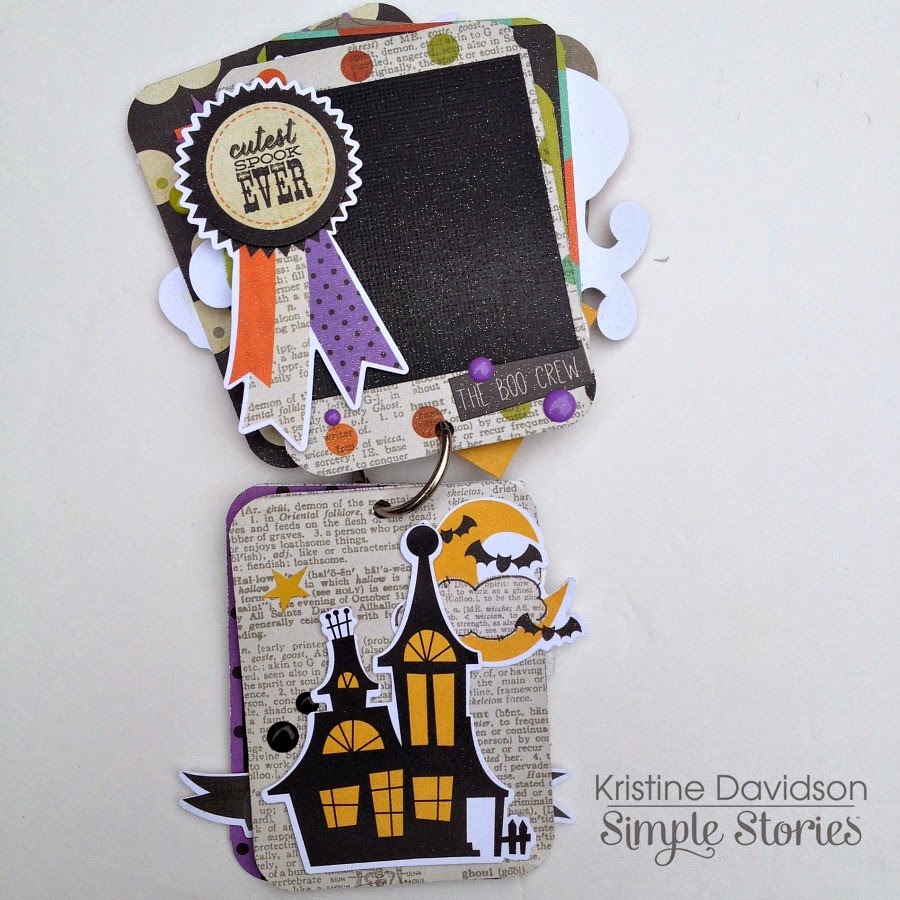
It's no secret, I love Halloween paper collections. One of my favorites ;-) I'm not sure if this the colors, the ghosts and goblins.. i just find it so easy to create pages and this little mini album. I used the latest Simple Stories collection - Frankie & Friends, tons of diecuts and pop dots and some Therm-O-Web Glitter Dust <<< AWESOME STUFF!

My mini album is quite easy to create and was inspired by Leanne Allinson's mini album posted on the Jillibean Blog yesterday.


You can see on this next photo the Glitter Dust sprinkles on my diecuts and papers. It's a bit sticky but not excessive, and dries in a matter of minutes and no real smell. LOVE THIS STUFF!!


There you have it! How cute is that? Love those little diecuts and bright colors.

This wasn't part of a design team project but more of a fun mini album for me to enjoy and use up some of my Frankie & Friends Products. 


Tuesday, April 01, 2014

Going Places | Paper Camellia

Hello Friends!

It's April 1st today! Were you fooled today? I actually pulled a little one and told my coworkers we were going to get some sunshine tomorrow and 14degrees! LOL.. That's funny ;-/ ( NOT! ) I'm over winter, tired of this snow and well I created this mini album of my trip to California - were it was sunny and over 14degrees!

This was created using the Paper Camellia April Kit and Add On Kit.


It was a great weekend in California and I wanted to document some of those fun memories I had with some friends . We took a tour from Anaheim to Hollywood and it was so much fun. We got to see so many great sites, and visited some iconic locations as well. The Holly wood sign, Chinese Theatre, Beverly Hills, Rodeo Drive and So Much more. 


Interested in creating your own mini album..

Come back tomorrow - i'll be sharing more creations !

Sunday, November 24, 2013

Days In December 20-24 | Paper Camellia

hello Friends
Sharing more of my Days in December Mini Album with you today. As i get the album started with photos and more little extras I'll post pictures here on my blog ;-)

Day 20
i used a kraft card envelope
i sprayed color shine and added washi tape to the edge.
instead of punching holes in the envelope I added a 1" piece of cardstock behind
the envelope - this was sewed and it allowed me to keep my small envelope in tack in my mini.  So easy to do !

this can keep some receipts, or small gift tags or something else that i might want to hide ;-)


day 22 -
I cut out a word with my silhouette again
believe, this can be anything as well, such as peace, giving, gratitude, wishes,
whatever you like.

Kerri Bradford has some amazing words or you can find tons of free ones on pinterest.


Day 23 - I told you i love confetti pockets!
another one was added and in this pocket i put all my little mini left overs - i added little numbers from the Fancy Pants number sheet, I added cut up pieces of vellum from the diecuts i didn't use and lastly i added 2 enamel dots glued together for front and back ;-)


Day 24 -
i created the little tree with left overs again, i think these were flags maybe ? not sure but they were perfect for my tree, I added enamel dots and VOILA ;-)


Day 25 i left blank, i want to add to it on Christmas Day - probably a photo collage or large 6x8 photo of our tree in the morning or family photo.

i have tons of left over photo protectors so at any time if i want to add more pictures i can ;-)

Thank you SO Much for visiting and I hope you were inspired to create with your December Days kit from Paper Camellia 


Happy Holidays to you and your family
Kristine

Saturday, November 23, 2013

Days In December 11-19 | Paper Camellia

 Hello Friends,

I'm sharing more of my mini album ( Days in December ) for you today.
I'll be sharing days 11-19.

Days 11-19
I added some detail with my sewing machine, i have grey thread but you can use gold, white, red, green any color to add details.
I also used Pop dots on my stars and a few diecuts just to give the album thickness


As you can see I used quite a few MME word stickers on my days as well, adding words such as JOY, Wonder, Peace etc..  i love those for every day reminders.


It's been a few years since my husband and I were able to enjoy Christmas with family. I usually work shift work and Christmas day was always  a day I was stuck working or we had other issues not allowing us to be available. This year, I have 2 weeks vacations and soo looking forward to spending time with my family. I am more than positive this will be a great Christmas, so i can add those under my favorite holiday memories.


Day 14- i created with a punch a small tag, you can cut up a rectangle piece of paper for this - just a few inches, I also added a white doily for detail.


Day 15 - I used the North Pole Express card and punched out the number 15
the JOY was cut up with my silhouette on gold glitter paper.
( you can add a star, an angel, anything you'd like or even add a large photo for this instead.


Day 17 -
I added one of my favorite recipes. My Mom makes this AMAZING lemon Dessert
from a Better Homes and Garden magazine i think,, but she adds a bit of herself to create it. It's AWESOME! so i added that in my mini.

The other side of this will be a 6x8 photo collage of something Christmas related during this time.


Day 18 - I love confetti! i created some with left over papers and a punch, added some larger stars and also
added 2 word stickers glued together so they show on the front and back of the page.


Grab your December kit and come create along with us!
More pages to follow ;-) 
Copyright © Kristine Davidson. All Rights Reserved.
Blogger Template by The October Studio